Part 2. Integrate with Onet Konto
This section will describe how you can integrate your service with Onet Konto properly.
Conceptual introduction
Onet Konto uses Authorization Code Flow defined in OAuth 2.0 RFC 6749), which exchanges an Authorization Code for a token. The picture below shows the flow:
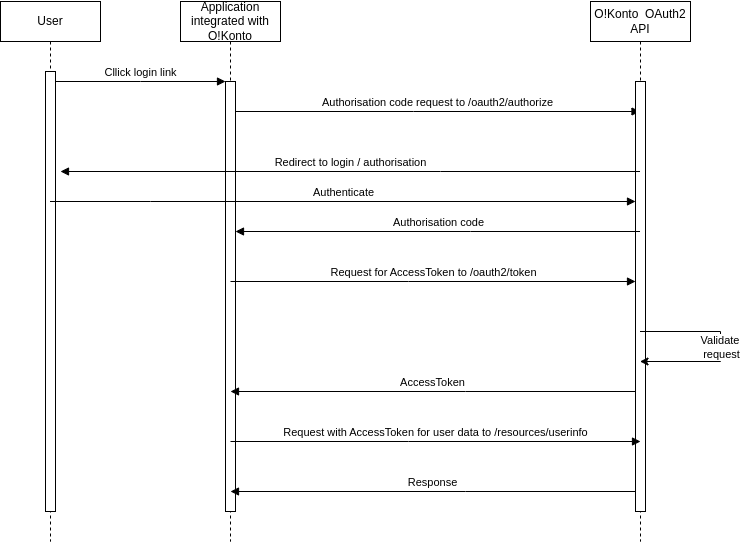
How it works:
The user clicks “Login” in application
Your application redirects user to the Authorization Server (oauth2/authorize)
In Authorization Server redirects the user to the login and authorization prompt.
The user authenticates and may see a consent page listing.
Authorization Server redirects the user back to the application with an authorization code
Your application sends request with authorization code to Authorization Server to exchange it for access token (/oauth2/token)
Authorization Server responds with access token
Your application can use the Access Token to call an API (resources/userinfo) to access information about the user.
We also support SSO(Single Sign-On). Read more about it SSO in Accounts And Federated identity management.
Step 1. Create link for login button
As Onet Konto supporting SSO, Onet Konto users can be logged in to many services (Onet Poczta, Onet Premium, Newsweek etc) at the same time. To achieve this you need to check if the user is already logged in SSO domain before redirecting to login page.
Let suppose that you have received the following data from us:
client_id = demo.front.onetapi.pl
client_secret = s7ZVWXjydoWmOBUngQUWj4mHGnrHVd6f
Redirect_uri /authorize is a path in your application, where we exchange authorization code for access token. We will explain it later in Step 2.
Firstly you need to built link to our SSO domain:
https://konto.onet.pl/checkSSO/login.html?client_id=demo.front.onetapi.pl&redirect_uri=/authorize&state=dashboard
- Parameters:
client_id - provided by Onet Konto team
redirect_uri - redirect uri implemented in your app and configured by Onet Konto team
state - allows you to pass information back to your application and it will be helpful if you want to for example store an information when user should be redirected after login process.
If you build link this way user will be redirect to SSO domain, where we will check if he has been logged already in any of services integrated with Onet Konto. If it’s true, we will not prompt user for login, otherwise we will redirect user to login form.
Step 2. Coding redirect endpoint
We’ve created url for log in button already. Now we need to create endpoint in your application for handling redirect from SSO domain to exchange authorization code for access token. On this endpoint you will receive GET requests from SSO domain with authorization code in url param “code”.
Redirect endpoint must be created on the backend side, because to make this step you use “client_secret”. This is “master password” for your integration and must be kept in a secure place and never send to user browser or disclosed to anyone.
To get access token you should take this param and send a request to Authorization Server as below:
 curl --location --request POST 'https://connect.okonto.pl/oauth2/token' \
    --header 'Authorization: Basic ZGVtby5mcm9udC5vbmV0YXBpLnBsOnM3WlZXWGp5ZG9XbU9CVW5nUVVXajRtSEduckhWZDZm' \
    --header 'Content-Type: application/x-www-form-urlencoded' \
    --data-urlencode 'code=<your_authorization_code>' \
    --data-urlencode 'grant_type=authorization_code' \
    --data-urlencode 'redirect_uri=https://<your_domain>/authorize'
If this request completes successfully you should receive response like below:
{
"access_token": "047b0a8339c7fb9f623d3e2e8ae69c2z3eh5r4df1501pa34cba8439f7d0c2c1fcs",
"token_type": "bearer",
"expires_in": 36000,
"refresh_token": "3786016856301de8f1e7b47036op24df820e683863e2908fb7544ceb9737f1d8cs"
}
Now you have 2 tokens: access_token which you can use for retrieving user information from Authorization Server, and refresh token which may be use to refresh access token in the future.
Read more about token endpoint Token endpoint
Step 3. Getting information about user
Now you have access token, it means that a user was successfully authorized in Authorization Server and session has been created already. In this step I will show you, how to retrieve an information about a user. To do this you should send a request to Authorization Server as below:
curl --location --request GET 'https://connect.okonto.pl/resources/userinfo?client_id=demo.front.onetapi.pl' \
    --header 'Authorization: Bearer <access_token>'
If this request completes successfully you should receive response like below:
{
    "sub": "71c97af0-662f-4b7a-9236-93c688d15916",
    "email": "user@konto.onet.pl"
}
In a response you can find 2 values: email of user and sub parameter which contains an unique identifier of user in Onet Konto.
Read more about this endpoint Basic UserInfo endpoint
At this point, the authorisation code flow has been completed. In the next section, I will show you how to log out a user.
Step 4. Logging users out
To logout users you will need to redirect a users to SSO domain, where their main session is stored.
https://konto.onet.pl/checkSSO/logout.html?client_id=demo.front.onetapi.pl
This url will redirect a user back to redirect_url you specified when registering to Onet Konto, but without code so you need to handle that case.